|
|
|
|
|
||||||||
|
|
|||||||||
| Home | Forums | Register | Gallery | FAQ | Calendar |
| Retailers | Community | News/Info | International Retailers | IRC | Today's Posts |
 |
|
|
Thread Tools |
 January 13th, 2010, 17:57
|
#181 |
|
A-56 aka Mr.Hitman
|
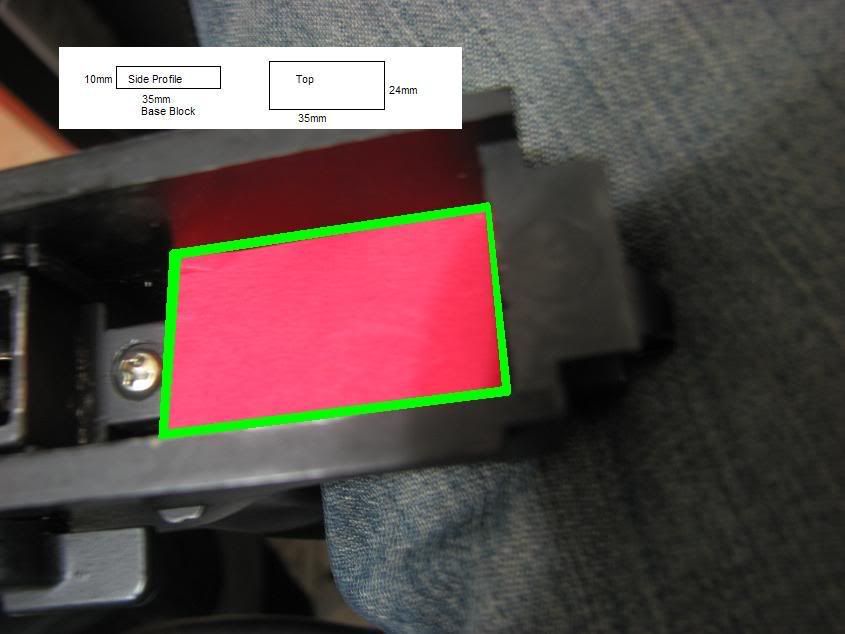
Here's what I've done.
The lower trigger part, I've used BIG's method. The space behind the trigger mech is 50mm in lenth. The bolt moves back around 4-6mm into that 50mm gap. Note that if you do fill the all 50mm gap, you will reduce most the recoil, and have a longer lasting hinge plate, and result in short stroking (bolt won't lock back). I've took foam cusions from Shooters Design slide packaging, neat red too. I've cut it so it's 46mm L x 24mm W x 26mm H .  Here are the pics. Also, to reduce the shock, like Airsoft Surgeons method for hi-capas, you can probably find a rubber washer and throw it on the recoil spring rod. Not too big, but big enough for the spring to fit through the washer with the rod. Just a thought.   
Last edited by Shirley; January 13th, 2010 at 18:00.. |

|

|
|
January 13th, 2010, 20:48
|
#182 |
|
Tys
|
Sweet Hitman...race gun ready red
|
|
|
|
|
January 13th, 2010, 21:07
|
#183 |
|
A-56 aka Mr.Hitman
|
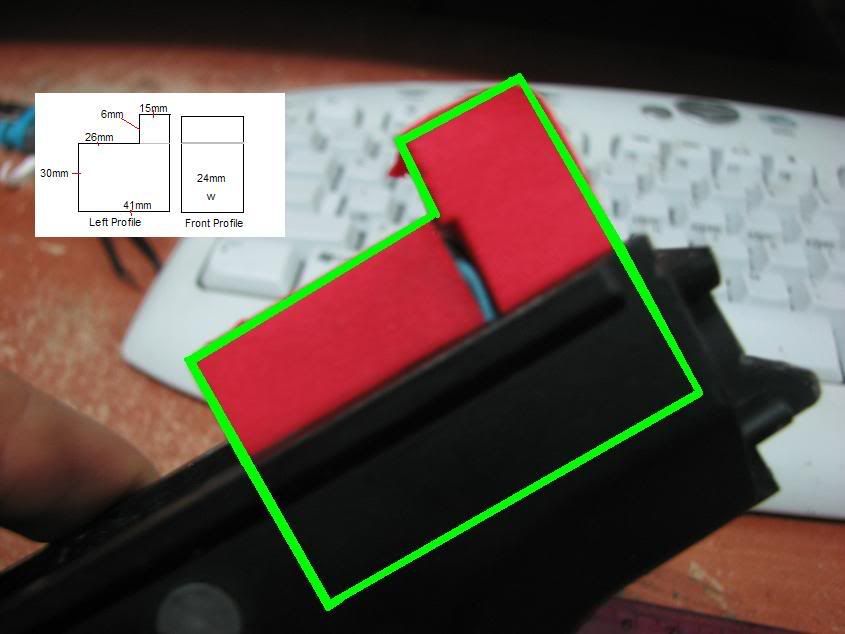
Back to the drawing board. Did it too low and it still made a bit of impact. Here's the proper one.
|
|
|
|
|
January 14th, 2010, 10:21
|
#184 |
|
Great
 Tell us how it perform! Tell us how it perform!My block is 23mm X 23mm X 32.7mm. And I needed to place it a bit forward (like 0.3mm) so a 33mm long block should be perfect. I ajusted my block with the bolt and the spring block in place. using a straight rule and pulling the bolt backward you can see if it touch the PVC block or the normal block first. My set-up allow the bolt to touch the PVC block before and there is like 0.2mm of free space between the normal block (spring rod) and the bolt. I should receive my parts today or tomorrow so I'll be able to try it out. On a different note: I noticed that the brass cylinder is nor parallel to the upper body and that result in the bottom of the bolt getting into contact with the brass cylinder like 8-10mm before battery. I'll try and take some pics tonight. Did any of you have that same problem? Can somebody take a look and velidate of that angle if normal or not? I can easyly see the angle between the brass cylinder and the upper body. I am under the impresion that it should all be aligned. not angled  Thanks
|
|
|
|
|
|
January 14th, 2010, 11:00
|
#185 |
|
A-56 aka Mr.Hitman
|
I have had minor scratches from the bolt to the brass cylinder too. It was minor and on the bottom of the cylinder. I'm not sure how to fix that though.
The block performs perfect. It absorbs the recoil, and gives little impact to the rear of the rod. You can hear and feel the bolt moving back when it hits the foam block. The reason why I raised the back block up 6mm is to have it rest and pushed down on the read of the rod. |
|
|
|
|
January 14th, 2010, 11:30
|
#186 |
|
Tys
|
the brass part is the cylinder/cylinder head essentially.
The external condition of it is immaterial..it does not serve as a airseal component of the system...but I would be more concerned of the internal finish of the cylinder because the nozzle (stainless steel) might be impacting it. As much as I know...it should be inline with the barrel...which should be inline with the direction of the bolt. But there's some extra pieces and screws holding the scar chamber/barrel in place...maybe some of those have gone out of alignment. Tys |
|
|
|
|
January 14th, 2010, 11:56
|
#187 | |

|
Quote:
Beat me to it... 
__________________
 |
|
|
|
|
|
January 14th, 2010, 16:26
|
#188 |
|
Also...
My bolt catch won't stay in place when I remove the lower from the upper receiver. There is nothing to keep it in place. Do you guys have the same problem? I'm looking at RAtech videos on youtube and you can see the guy handling the lower without the bolt catch falling from it's place. is it supposed to clip in place or what? Another thing: I removed the trigger assembly and inspected it. There is no oil or grease anywhere in this assembly. It was very very dry. I read about the silicone spray to lube the O-ring when you get it but the trigger require grease also!!! Thanks. Last edited by BIG; January 14th, 2010 at 16:33.. |
|
|
|
|
|
January 14th, 2010, 16:30
|
#189 | |
|
Can't fix my own guns. Willing to fix yours.
|
its just friction fit
__________________
 Words to live by Quote:
|
|
|
|
|
|
January 14th, 2010, 16:36
|
#190 |
|
Tys
|
It just fits in the mold...just don't turn the grip upside down...LOL
I use some silicone oil in my mags...and the oil gets blown up/around into everything. Go ahead and apply silicone grease (or grease that won't eat rubber) to any moving parts/pivots/contact parts/springs/etc...won't hurt anything. Not big globs of it...but grease will stay put. Tys |
|
|
|
|
January 14th, 2010, 17:17
|
#191 |
|
|
I tend to keep my trigger group as low-oiled as possible. For just the same reason. Mags will spray oil around there, and too much grease attracts sand, dust, dirt, and other paticles that can assist in chewing up the white metal trigger assembly.
__________________
|
|
|
|
|
January 14th, 2010, 22:06
|
#192 |
|
A-56 aka Mr.Hitman
|
I sprayed the trigger group with white lithium (Don't spray to rubber). The hammer will likely to wear out though. The thing about oil bursting out, I hate it! LOL I hate when the gun looks all oily on black.
|
|
|
|
|
January 15th, 2010, 10:15
|
#193 |
|
AT LAST!!!!! I was able to fire a couple of shots with my gun last night.
The glued block didn't stayed glued after 1 mags (CO2) but it continued to do the job. I will drill 2 small holes and bolt it into place. Men, what a fun gun to play around with. I emptied the co2 cartridge after barely 1 mag
|
|
|
|
|
|
January 15th, 2010, 15:28
|
#194 | |
|
|
Quote:
But then again - I don't really use full-auto either...
__________________
|
|
|
|
|
|
January 15th, 2010, 15:51
|
#195 |
|
well, forgot to mention it was -10ºC... Might have an impact!
|
|
|
|
|
 |
|
||||||
| Bookmarks |
|
|
 |
|